A Guide To Using Your Website
Welcome to WordPress! You'll find you can edit most aspects of your website yourself, once you get familiar it is quick and easy.
If you want to jump right in, here are your quick start essentials
- Staging Site: learn how to create your Staging Site - this is a copy of your site allowing you to practice editing without affecting anything
- Page Builder Intro: watch the introductory video about how to use the Page Builder.
- Key Information Guide: we've put together key information about your website - how to change the items that you need to know most.
Staging Site, Updates and Backups
Staging
From your WordPress dashboard, use the WPEngine, Staging item to copy your current production website across to your staging site. Get the link and login into it using your normal user id. You can make changes in Staging without affecting production. Use it as a practice ground, or if you want to make a set of changes, you can then copy the Staging site back over to Production.
You can also use Staging to try out new plugins or test updates before they are run on your Live site
Plugin Updates
Your WordPress website requires regular updates for plugins. It is recommended you know how to create backup points so you can restore your Live website to a prior backup if needed. You can also create a Staging site (a complete copy of your Live website) so you can try out new plugins or test updates before they are run on your Live site.
- Updates: Keep your website up to date - visit Dashboard, Updates regularly and make sure you are running the latest versions of WordPress, plugins and your theme.
- Backup Points: Create a backup point before running updates using Dashboard, WP Engine, User Portal (or just login to my.wpengine.com) and create a manual backup point. You can Restore to this backup point if needed.
- Test After Updates: After making changes such as updating WordPress, plugins or your theme, you should check your site still operates normally, particularly for your important website functions such as enquiry forms, online sales or service/product pages.
The process of updating theme and plugins is described in full in this article WP Engine Overview and Recommended Practices.
If you are updating the WooCommerce plugin, it is suggested that you first update all other plugins, then update WooCommerce last.
It is recommended you regularly, and definitely after upgrading your website, purchase a product from your website. Make a full payment so you can see the payment gateway working correctly, and all email notifications work correctly. You can use the test coupon code to reduce the payment amount by 99%.
Page Builder Information
Your website uses the WordPress CMS with a front-end Page Builder.
To learn more about your Page Builder:
Saved Rows and Saved Modules
These are the saved rows and modules available to reuse on your site.
Saved Rows:
- Article Header - Automatically applied to all articles to put the title and featured image on top of the content
- Art Associations - Aboriginal Art Code
- Article Separator - Global Separator with pre-set styling
- Learn More - Set of links to 'Learn More' content
- Roc Art TOC - Set of rock art links
Saved Columns:
- Map Sidebar - A column containing the google maps locator for the Japingka art gallery
Saved Modules:
- Black Button - A black, customisable button
- White button - A white, customisable button
- Colour Palettes Button - A button styled for use on colour palettes pages
- Divider - A thick, single line divider
- Featured Artist (Global) - A module to display the current featured artist
- Go Back - A styled button which will return the user to the last page they were on
- Master Collection Content Grid - A content grid with settings ready to be used on master collections
Notice some rows and/or modules are global. A global row/module also appears as a gold colour when hovered over in Page Builder. Edits to a global row/module on one page will automatically appear anywhere the row/module appears on the website. All other rows/modules are a blue colour and are standard. Edit a standard row/module and the change appears only on the page on which you're working.
Please Note: Do not delete global rows
Analytics
If you have elected to have Google Analytics and Google Search Console configured for your website, you can review the details as follows:
- Google Analytics: Visit Google Analytics
- Google Search Console: Visit Google Search Console
Japingka Website Administration Guide
Your website uses the WordPress CMS – for an introduction to general WordPress functions go to:
- Videos: Dashboard, Manual, Videos (for video walk throughs)
- PDF: Dashboard, Manual, User Manual (for a PDF guide)
Content Updates
Most site content one of the following types: Page, Collection, Article
Important note: As of the 2018 site upgrades, the all 'Posts' were replaced by 'Articles'. The /blog/ page is now a category of articles, Category: Articles - Blog.
There are three subcategories which each post should be further categorised into: Events, Exhibition Updates, News.
Collections and Articles need to be assigned a Category to control where they appear on the website. Without a category, a Collection or Article will not be accessible from the navigation.
To edit an article, click the 'Page Builder' button up the top of the website, in the Admin Navigation Bar.
To edit a collection, click the 'Edit Collection' button up the top of the website, in the Admin Navigation Bar.
Other Updates:
- Paintings: these are normally loaded using the Bulk Load facility. Add/edit paintings manually using Dashboard, Paintings
- Menus: add new items and reorder using Dashboard, Appearance, Menus
- Forms: edit forms using Dashboard, Forms. Click an existing form to edit. To place a form in a page, use the Add Gravity Form icon in the page edit, next to the Upload/Insert link.
- Footer: edit the footer - including Hours - using Dashboard, Builder, Themer Layouts, Website Footer, Page Builder (Knowledge of Page Builder will be necessary to edit/update the footer. Please refer to the Page Builder information cited above)
Home Page
Featured Images at top of Home Page
Prepare images before uploading to size of 800px by 900px high. The image should have a darker aspect across the bottom, suitable for the white text overlay. If necessary, a transparent gradient overlay can be added added to an image to make it suitable for the home page (this will require Photoshop or another graphics tool).
To update the image, open the Page Builder for the Home page, click on one of the elements in the three columns that make up the top row of the home page. Click on the Column icon, and choose the Column Settings. This allows access to edit the Photo background.
Knowledge Base Articles
The OM4 Support Desk Knowledge Base has many articles describing how to carry out specific tasks.
Adding Posts with Images
To add an image to a Blog Article, open the Page Builder editor. Add a photo module. In settings, click Select Photo. You can either select an image previously uploaded to the media library, or you can upload a new image. Make sure that Title, Caption and Alt text are filled out. Title = formal title of the image for search engines (not visible to people), Caption = visible caption under the image, Alt = textual description of the image for screen readers and alternative devices.
You can adjust the settings of the Photo Module to set the way the image displays (alignment, margins etc.) and drag the module around to put it into position.
Image Sizes
- Home Page Grid: 1140px wide with 14pg gaps
- Home Page Slide: 695px by 368px
- Home Page Rotator (Artist): 266px square
- Page Slide: 1140px by 184px
- Artist Featured Image: 652 x 107px
- Exhibition Image: 960px on the long side
- Exhibition Thumb Home: 160px wide by 240px high (exhibition thumbs on Home page)
- Exhibition Thumb Inner Feature:600px by 900px high (two featured at top of Exhibitions)
- Exhibition Thumb Inner: 300px by 200px high (other exhibitions on Exhibitions page)
- Painting Images: 2560px on the longest side, and at least 389px high
- Article Images (old narrow format): 695 x 350px (main) 432 x 350px (sidebar)
- Article Images (new wide format): header 1140px wide body - any size
Collections
Collections are used to group paintings and display them. Categories are used to link individual paintings with the Collection record itself, so in most cases:
- create a Category for the new collection using Collections, Categories and make a note of the Category ID
- Edit a similar Collection record and copy the shortcodes used to display the collection header and paintings for the collection to your clipboard. There is an optional videopop shortcode. If there is no video for the Collection, you can safely remove it.
- Create a new Collection record using Collections, Add New and assign it to the category. Paste the shortcodes from your clipboard and update to the correct category ID and text before saving. Use the Categories meta box to ensure that the collection is assigned to the category that corresponds to the category id used.
- Use the Subtitle field, below the main Collection text edit field, to assign a sub title - use Gallery 1 or Gallery 2 for exhbitions, or add additional descriptive text to appear below Collection titles for other collection types.
- Tick the box(es) for the correct category, and assign a Featured Image. Save the Collection
- Create new painting records using Paintings, Add New and assign them to the category as well.
Exhibitions
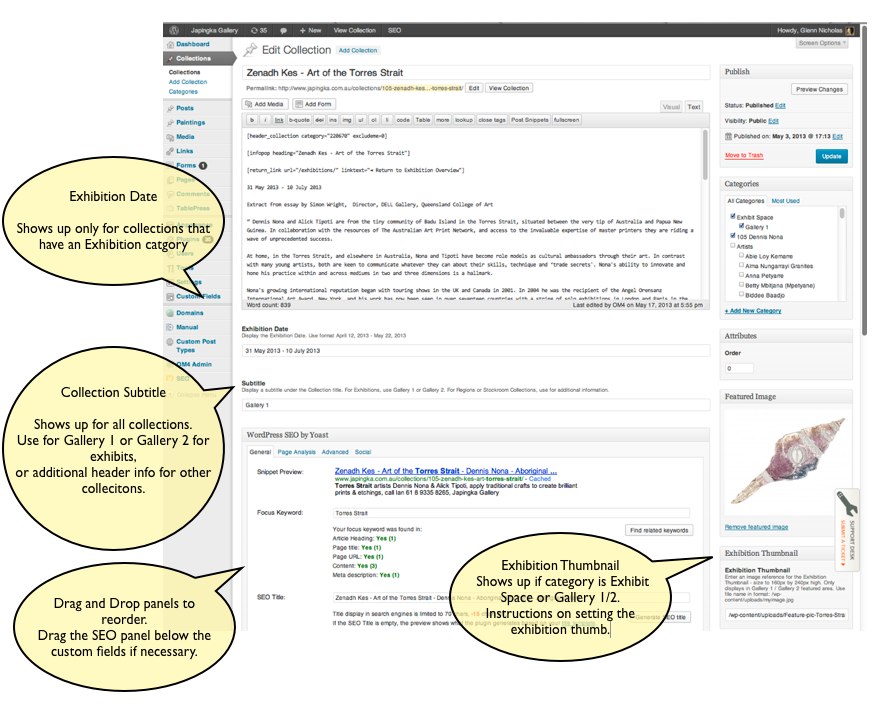
Collection Field Locations
Exhibitions are a special type of Collection, recognised by being added to one of the Exhibition categories.
These collections have some additional fields on the Edit Collection page:
- Exhibition Dates: enter the to/from date of the exhibition
- Exhibition Thumbnail: for exhibitions categorised in the Exhibit Space or Gallery 1 or Gallery 2, prepare an Exhibition Thumbnail 240px by 160px high, upload to your Media Library and enter the jpg file name in the thumbnail field. This field is located below the Featured Image on the right hand side of the Edit Collection page.
Aboriginal Art Centres
The top of page gallery of Art Centre images each link to more information about the particular Centre further down the page. To update Art Centre details:
- Login to the Aboriginal Art Centre page using Page Builder
- Hover over the Centre to be updated
- Update the image by clicking on the Column icon (Edit Columns) and select Column Settings from the dropdown list
- Update the heading by clicking on the Spanner (Header Settings) icon
- Update the destination of the link by scrolling to the long description of the Centre and clicking on the Spanner (Header Settings) icon. Select the Advanced tab, and edit the word in the field HTML Element Id. Use a single word that describes the centre name eg barkly or anindilyakwa. Make a note of the word so you can update the corresponding Centre image link in the top gallery
- Update the Centre image link in the top gallery by clicking on the Spanner (Header Settings) icon. Update the Link field with the single word from the step above. Note however that # sign now precedes the link word eg #barkly or #anindilyakwa
Categories
- Artists - category to identify all Artist collections
- Individual Artist Name - create 1 category for each artist to link their portfolio images
- Artwork - this is a category to group different types of collections
- Affordable Art
- Collectors
- Limited Edition
- Special Offers
- What's New
- Exhibit Space
- Exhibitions Recent - add collections to this category to have them appear on the Exhibitons page
- Gallery 1 - put one collection in this category to show in Gallery 1 on the Exhibitions page
- Gallery 2 - put one collection in this category to show in Gallery 2 on the Exhihibitions page
- Exhibitions
- Individual Exhibits - create a category for each exhibition
- News
- Regions
- Individual Regions
- Stockroom
- Stockroom Collections - create a category for each collection within the Stockroom
See Japingka Categories.xls.
Importing Paintings with the Bulk Importer
The Bulk Importer will normally be used to load groups of paintings for an exhibition. But it can also be used to load other groups of paintings, for example, an artist folio.
Before loading an exhibition, ensure you have an accurate and consistent Exhibition Name, as this will be used as the category to cross link paintings. Spelling or other errors in this category name can cause problems later on.
The process of adding new paintings is as follows:
- Prepare CSV file as per the instructions below.
- Import list of paintings from the CSV file using Dashboard, Tools, Import, Paintings
- Prepare the painting images using the instructions below. Then upload them using Dashboard, Media, Add New.
- Check for orphans:
- use Dashboard, Media, Unattached for orphan images
- use Dashboard, Paintings, filter by category for orphan paintings (no featured image) - Add more images/painting entries if required
- Collect the Category ID # for the Exhibition
- Create the new Collection page (copy and paste from another Collection - update category id and any text)
Preparing the CSV File
The first row in the CSV file must be the header row, with the column names matching the column names in the table below.
The following columns are supported by the importer.
You can also download this Sample CSV File.
Q: Why won’t my special / accented / foreign / apostrhope characters import properly?
A: The file you are importing must be properly encoded as UTF-8. One way to easily do this is to import or create it in Google Docs spreadsheet, and download from there before importing. Open office also works well, but MS Excel most likely will not work.
Alternatively, in Excel you can manually change the curly apostrophe characters to straight apostrophe characters.
| Column Name | Required / Optional | Description | Example(s) |
|---|---|---|---|
| Jap Number | Required | The Painting Jap Number (including Jap prefix and leading zeros) | Jap 007684 |
| Title | Required | The painting's Title | Grandmother's Country |
| Exhibition | Optional | The painting's exhibition(s). This field is mapped to the Exhibitions categories. If the exhibition doesn't already exist, a new category is created for it. Multiple exhibitions can be specified by separating them with commas. | 096 Heirs and Successors |
| Web Order | Optional | The display order for the paintings. Number 1 is the first painting displayed on the website, number 2 is the next, and so on. | Any positive number (integer) |
| Artist | Optional | The painting's artist(s). Multiple artists would typically be comma-separated. This field maps to the Artist text field. It does not change the Artist Categories at all. | Gracie Ward Napaltjarri Damien Marks Tjangala & Yilpi Marks Atira |
| Medium | Optional | The painting's medium. | acrylic on linen |
| Dimensions | Optional | The painting's dimensions. | 106 x 76 cm |
| Region | Optional | The painting's region. This field is mapped to the Regions categories. If the region doesn't already exist, a new category is created for it. Multiple regions can be specified by separating them with commas. | Alice Springs |
| Artwork | Optional | The painting's artwork. This field is mapped to the Artwork categories. If the artwork doesn't already exist, a new category is created for it. Multiple regions can be specified by separating them with commas. | Stockroom, Limited Edition |
| Price | Optional | The painting's price. See the New Painting screen for a description of valid values. | [Blank] / [Empty] POA 999.00 |
| Sale Price | Optional | The painting's special price. See the New Painting screen for a description of valid values. | [Blank] / [Empty] 999.00 |
| Sold | Optional | Whether the painting is sold or not. | [Blank] / [Empty] sold |
Preparing Painting Images
When images are uploaded to WordPress (using Dashboard, Media, Add New), we automatically detect if the image contains a Jap Number, and if so we attempt to link that image to the corresponding Painting record.
The painting images should be resized at the size above (Image Sizes section), and exported using Photoshop's save for web feature.
The Jap Number must be included in the image's file name. The Jap Number must include the "Jap " prefix, and any leading zeros. For example, the following would be valid image file names:
Jap 007925.jpg
Artist Name Jap 007684.jpg
Whereas the following are Invalid file names:
007925.jpg
Jap007925.jpg
007925 Jap.jpg
Displaying Paintings
What the Bulk Painting Importer Does
The bulk paining importer makes it easy to add or update paintings on the website.
See above for a description of the CSV file format, as well as details about each of the fields.
When importing a CSV file, the importer requires at least a Jap Number and a Title column.
The importer reads the CSV file. The first row in the file must be the column headings (header row).
For every other row in the file, the importer does the following:
- Checks the website's database to see if the Jap Number (painting) already exists in the website's database.
- If the Jap Number doesn't exist:
- A new Painting record is created using the data from the CSV file.
- If the Jap Number already exists:
- The existing Painting record on the website is updated with the new data from the CSV file.
For example, if the CSV file contains aTitleandArtistfields, then the existing Paining record is updated with the newly specified Title and Artist data.
- The existing Painting record on the website is updated with the new data from the CSV file.
- For the fields that are mapped to Categories (Exhibition, Region, Artwork), the importer checks to see if that Category name already exists. If it does, the painting is added to that Category.
If it does not already exist, a new Category is created and the painting is then added to that category.
If you would like to assign the Painting to multiple categories, you can separate multiple categories with a Comma.
Sidebar Featured Artist
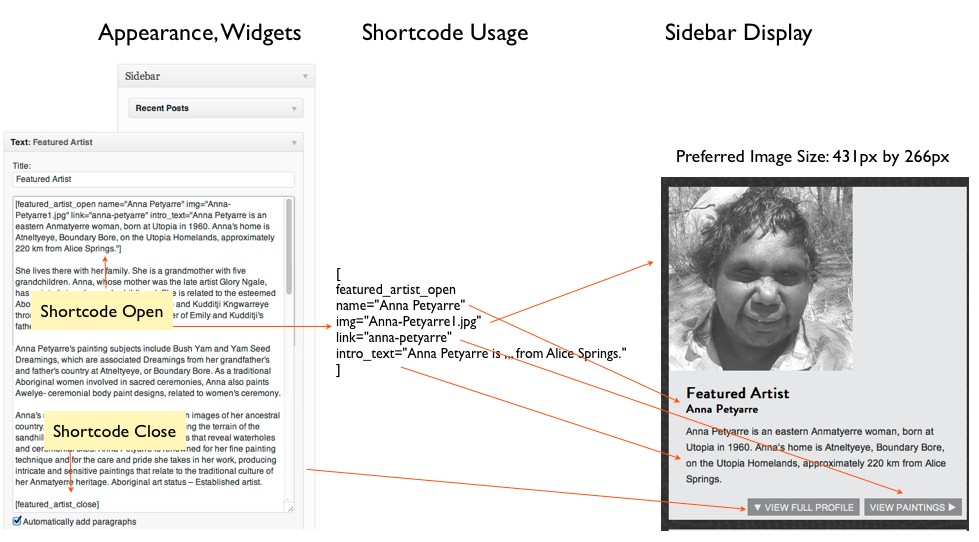
Click to Enlarge
Articles
Wide Format articles
Articles can be created using a wide 2 column format as follows:
- Create a new article and apply one of the Page Builder content templates (Articles no image border, Article Image Border)
- Replace the content of the template with the content relevant for the new article.
- If using the Image Border Template, after replacing all the images, adjust the widths of the columns to size the top row images.
Old Method for Reference
Articles can be created using a wide 2 column format as follows:
- Create a new article and use the Classes panel (bottom right of editor) to add a Body Class of wide
- Use three shortcodes at the top of the article to control the header overlay, the article header image (a full width one) and and article_byline - see examples below.
- Edit the article using the [left], [middle] and [right] shortcodes to manage content into left and right columns. On a mobile the right column content will automatically collapse under the left.
[header_overlay img="header-aboriginal-art.jpg" text="Aboriginal Art Education"]
[article_header_image image="Jimmy-Pike-Header.jpg" alt="The Life and Art of Jimmy Pike, Artist"]
[article_byline author="David Wroth, Japingka Gallery" year="2017"]
Article images with captions
If the article has a popup image with a caption in the body, you can insert the image using the normal "Photo Module" button from the toolbar. Once the image is in place, set the Module settings to Display caption below image.
Enquiry/Purchase Flow
A typical enquiry/purchase flow is as follows:
- Customer adds one or more paintings to their enquiry cart.
- Customer completes the enquiry form/request.
- info@japingka.com.au then receives the "New Painting Enquiry From" email, and this email contains a link to the private collection that was automatically created. A corresponding "Web Collections" category is also created, using the customer's name and entry id.
- Japingka can then edit the collection, adjusting the text/wording on the page. See below for instructions.
- Japingka can then add one or more other paintings to the collection. See below for instructions.
- Japingka then sends the customer a link to the private collection.
- Customer then clicks the link to view the private collection, and they can add one or more paintings to their purchase cart.
- Customer then clicks "Purchase" to proceed to the purchase page/form.
- Customer then completes the purchase request form and submits it.
- Japingka then receives a "New Painting Purchase Request" email, containing all the information about the new order.
Editing the private collection
Go to Dashboard, Collections and edit the collection. The text/wording on the page can be amended just like any other collection.
Adding other paintings to the private collection
- Edit the collection, and take note of the Web Collections category (Firstname Surname xyz).
- Go to Dashboard, Paintings, and add one or more paintings to this category.
- View the private collection, and the newly added paintings should show.
Sending the private collection to the customer
When you are happy with the private collection, view the collection.
Then copy the URL of the collection, and send this URL to the customer.
How to Change the Featured Image for a Collection (Artwork Overview, Regions)
- Open the Collection from Dashboard, Collections. Use the Featured Image panel at bottom right to clear the existing featured image, then use the Set Featured Image link and choose a new Featured Image.
- Save your collection.
Re-ordering
News Posts: these display based on date/time of publication, most recent posts at the top.
Collection Thumbnails (Regions, Artworks, Stockroom Master) : Use the Order field for each Collection to set the order number; OR use Dashboard, Collections to view a category of collections, then click Dashboard, Collections, Reorder - now you can drag/drop the collections into a different order. Works well for small/medium categories of collections, not so well when you have a very large category.
Collection Wide (Exhibitions): orders by publish date, in descending order
Articles, Stories: orders by publish date, in descending order
Menus: to reorder menus use Dashboard, Appearance, Menus and drag/drop the menu items, then Save.
Email Troubleshooting
Email Troubleshooting
The Japingka website uses Postmark to send transactional email.
Check logs - Website Email Log and Postmark Activity Log
Check forms - Website Form Entries for Spam
Check Postmark for Spam Complaint (ian@japingka.com.au)
To resend notification emails use Dashboard, Forms, Entries and view the specific entry, then tick the 'Admin Notification' checkbox and click the 'Resend Notifications' button.
Add a New Artist
Create the Featured Image
Create a horizontal image 1200 x 197 high with the artist photo to the left and the featured artwork to the right.
![]()
Create the Artist Category
- Go to Dashboard, Collections, Categories
- Create a new category in the Artist's name, as a subcategory of Artists
Allocate Paintings to the Artist
- Go to Dashboard, Paintings, Add New
- Add the Artist's images and allocate to the newly created category
Create a Collection
- Go to Dashboard, Collections, Add New
- Add the Artist name as the Title; add body copy; allocate to the main Artist category and to the Artist name as a subcategory
- Add to the Artist Filters using the first letter of the first name
- Add the composite featured image mentioned above
- Add the Display Title; Subtitle; Excerpt (including a hyperlink to the Artist's region) - which all appear under the text editing window
Publish and check the appearance on https://japingkaaboriginalart.com/artists/
Edit Price Range Categories
Example: Change Price Range Under $400 to Under $500
Edit the Page
- Edit the price range page changing the slug, text references, the SEO snippet and the display title.
- Go to Dashboard, Tools, Redirection and add a redirection from the old page URL to the new edited URL (test its working)
Edit the Category
- Go to Collections, Categories and edit the price range category changing the slug and the name and any other references
- Go to Dashboard, Tools, Redirection and add a redirection from the old category URL to the new edited URL (test its working)
Notes:
- References to other prices ranges occurs within the text of some categories. Check the text in other categories in case references to the updated price range need editing.
- The category Under $750 has the URL https://japingkaaboriginalart.com/collections/affordable-art/ as affordable art is a significant search term.
How To Videos
Editing an Article
Match the Artworks page featured image with the Collection featured image
Clearing Caches
Content on the website is loaded dynamically and is then cached (saved) for up 24 hours in order to improve performance.
Whenever you are adding new information to the site (such as adding collections, updating/adding paintings, etc), you may notice the new information not appearing immediately when viewing the site as a guest (ie not logged in to WordPress).
If this occurs, you can either wait up to 24 hours for the new content to be displayed, or you can go to Dashboard, WP Engine, then click on Purge All Caches.
More details on WP Engine Caching and how to Purge the cache.